


This is the second of probably fourteen posts, each chronicling in detail the ins and outs of my Robotics class. I teach an introductory course using the LEGO® MINDSTORMS EV3 set. My students are 7th graders who are required to take the course and may not necessarily have any background in programming/building. My school is on a trimester schedule so the course runs for thirteen weeks at a time. For this particular trimester I have one class of twenty-four students and one class of thirty-four students. I meet each class for one 50 minute period each day, five days a week. I have thirty-four computers in my classroom and one EV3 kit for every two students. I’ve been teaching this class in its current form for two years, though I’ve been teaching Robotics for eight all together.
If you're following my posts you know I started with week 13 from last trimester because I wanted to show how my class looked doing a totally new project - both the good and the bad. So this post truly covers the first week of my class.
After initial introductions and classroom procedures I always begin my classes with the following learning target:
I can use manipulation and observation to determine the various properties of LEGO pieces.
This is the learning target I use for my beginning of course lesson plan that I blogged about here earlier.
There are a few reasons why I use this activity on the first day: 1) My year starts new every 13 weeks (trimester schedule) but I have no time between the end of one trimester and the beginning of the next; sometimes robotics' kits are just not ready to be distributed. 2) It helps me identify any trouble students that I may want to watch closely when I hand them a $300 kit the next day. 3) It helps me identify any pairs of students that maybe shouldn't be working together. 4) It's fun!
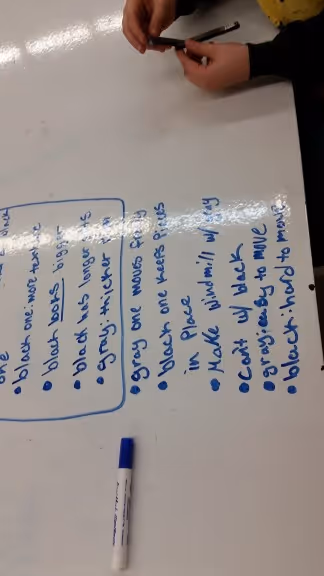
I don't want to repeat the whole lesson here (click this link if you want to see it). Here's a quick summary: Students are given the grey and black pins and told to write down five differences based just on observation. Then they are given beams to put the pins into and asked to use manipulation to come up with some more differences. This leads to a discussion of friction and the possible uses of these pins and ends with a call to use this method of observation and manipulation throughout the class.
Here are some of the results I got from groups this time around: (click on any image for a bigger version)
The level of detail some of the students notice and comment on, even on this first day of class is quite impressive.
In addition, some of the insight the students have into what the pieces do and what they can be used for is quite impressive as well.
I end this first day by telling the class that 'LEGO' is a corruption of two Danish words, 'leg' and 'godt' which loosely translated mean 'play well.' In my own opinion LEGO bricks and technic parts are the ultimate building toys because you can't help but learn each time you try to put them together. Either a particular configuration worked or it didn't work, either way you learned.
And that's day one.
On the second day I hand each group their kit and go through a checkout procedure. I have a form in Google Drive that I share with the class. It's basically an inventory list that they are putting their names on to attest to the parts, or lack thereof, in their kit.
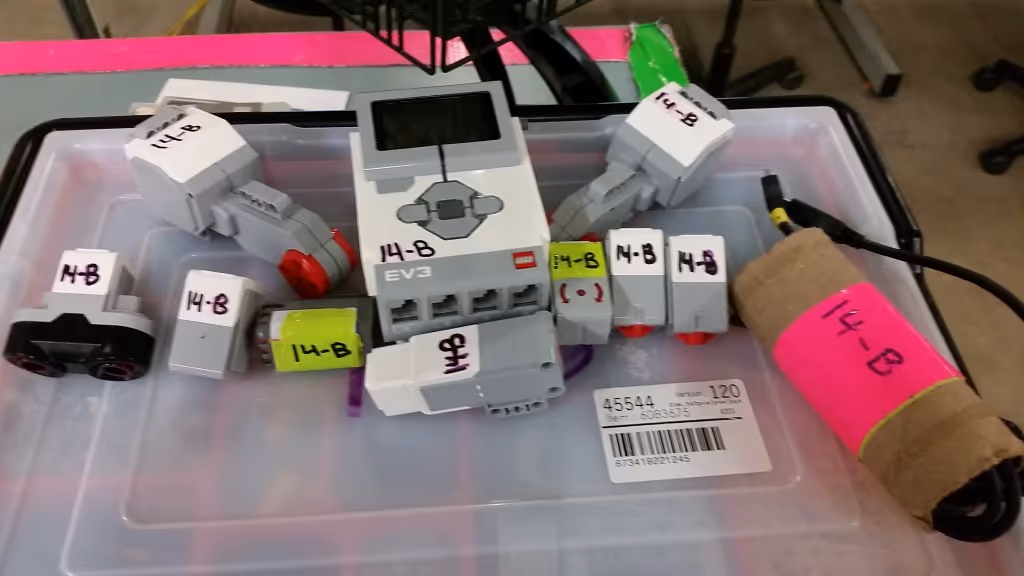
The pieces I have them accountable for are: 1 EV3 brick (I prefer to call it a micro-processor), 1 battery, 2 large motors, 1 medium motor, 2 touch sensors, 1 gyro sensor, 1 ultrasonic sensor, 1 color sensor, 1 NXT sound sensor, the caster wheel and ball (I keep these together), and one USB cable wrapped in a toilet paper roll. All these pieces are labeled with a number and letter as you can see in the pic below:
After they have their kits and have filled out their form letting me know if they have all their parts, I let them organize their kit. There are some teachers who are very particular about how they want their students to organize their kits. I'm not one of them. I feel it's important to let them organize in their own way. Some students take the rest of the period to arrange everything by size, color, type, and a thousand other ways. Some just put the small parts in the top lid and the big parts in the bottom of the kit and spend the rest of the period playing with the pieces. I don't mind; it's a small point but I feel very strongly in letting students take ownership of their kits and organize them any way they want.
By the third day of class we are ready to start building. The learning target I use is I can follow engineering diagrams to build my first robot. I have the students open the EV3 Software and I show them where the directions are for building the REM (Robot Educator Model) Bot. The only additional information I give them before they build concerns the axle and beam sizing. Otherwise I let them go. It looks like this:
You'll notice most students are at their computers with their kits while some are retrieving LEGO pieces from my rolling carts and behind them you'll notice bins both large and small on the tables in the back where the never-ending job of sorting continues.
The last two days of the opening week I have the students play around with some basic programming. Learning Target: I can use basic programming commands to make my robot drive in simple movements. Before they even open the EV3 Software I have them create a folder in their documents folder (we use Windows 7) in which to save their Robotics programs. I have never found a satisfactory way of having an entire class learn proper file and folder management - but I'm still trying. Definitely open to ideas and suggestions from other teachers out there.
I have the students run through the Basic Tutorials in Robot Educator. This involves having them do four programs: Straight Move, Curved Move, Move Tank, and Move Object.
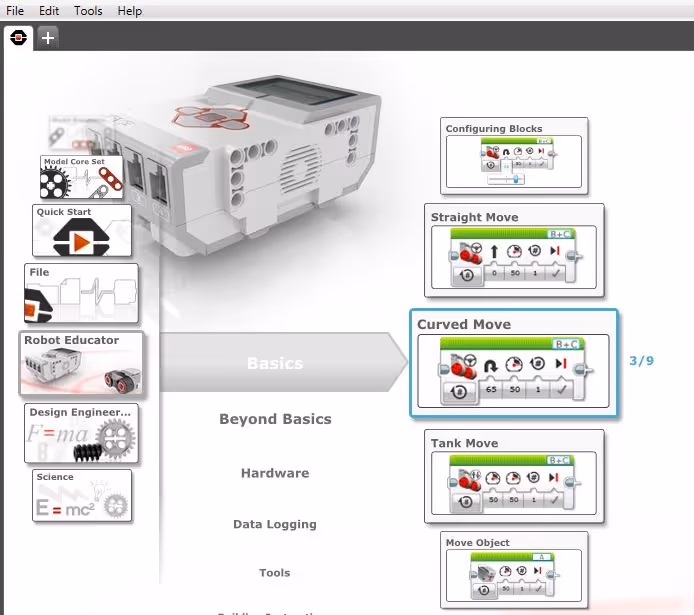
If you've never used the Robot Educator Tutorials in the EV3 Software, I highly suggest you check them out. They all follow a nice five step format: 1) video of robot doing the desired outcome, 2) build directions (which my class has already done), 3) same video along with the program; each icon highlights when the robot is doing the corresponding action in the video, 4) the sample program in the Content Editor, along with space for the student to create the program, and 5) encouragement for students to take their learning and try something new.
The part I like the most is step 4. When you click on an icon in the example it highlights where to find that icon in the programming palette below and circles in blue any inputs you need to change. In the example below I clicked the first icon and you can see that the Move Steering block in the palette below is highlighted.

The students go through these programs and finding them pretty easy have instant success. I am a little concerned that they are not fully understanding what is occurring so I ask them a lot of questions; specifically I ask them about the difference between the Move Tank and the Move Steering block. This can be confusing because the Curved Move tutorial uses the Move Steering block and the Tank Move tutorial does the same exact thing using the Move Tank block. It can make a 12-year old a little batty.
After completing tutorials and talking to me about the difference between Move Tank and Move Steering, I tell my students to do what they want. If they're hesitant I tell them to make their robot drive around the entire room. It's a lot of fun to see them try this or come up with their own ideas. Here's what the last couple of days of the first week look like, including a student's modification of Move Object, a crash and driving around the room - almost:
And that's the first week of my class!
.png)
.avif)
.avif)


